Installation
The sensor has a limited field of view. QUMEA’s technical support ensures that your installation reaches the desired coveral. For a complete room coverage, multiple sensors seamlessly working together may be needed. The higher the ceiling or mounting location, the larger the area covered by the sensor.
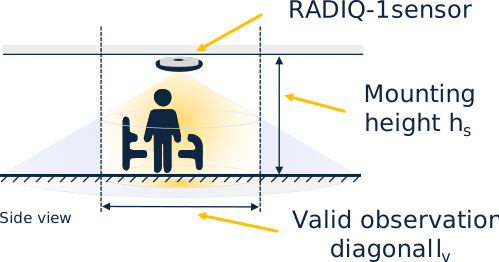
Sensor Mounting
The sensor is attached to a mounting plate using magnets. The mounting plate is attached to the ceiling or wall above the area to be monitored. The mounting plate and the connecting cable must be installed and secured in place before mounting the sensor.
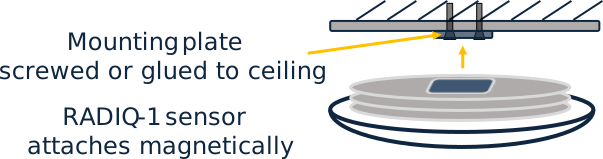
|
QUMEA’s support team are planning the installation at your location. Always ensure you mount the mounting plates at the exact location QUMEA’s technical project management has foreseen for your location. |
Mounting plate attachment
-
Secure the mounting plate to the ceiling using two screws (not included) with a diameter of 4 mm, glue (not included), or strong double-sided tape.
-
Ensure that the mounting plate is aligned parallel to the floor (do not install on a sloping ceiling).
-
When attaching the mounting plate using glue, use a highly reliable adhesive with a temperature resistance of at least 100 °C.
-
When using screws, use countersunk screws and make sure that the screw heads are flush with the surface of the mounting plate.
-
When attaching the mounting plate with tape, make sure that the tape meets the necessary requirements and that it covers the entire backside of the mounting plate (the entire surface must be covered).
-
For installations using glue or tape, it is recommended to check the attachment after 48 hours to ensure that the mounting remains stable and secure.
-
Make sure that the mounting plate is firmly and securely attached and cannot rotate or shift under any circumstances.
|
Cable connection
Ensure that the Ethernet cable reaches the mounting plate perpendicular to one of its sides. Ensure there is no unnecessary tension or bending in the cable. Cable conduit should stop at 35 mm from the mounting plate.
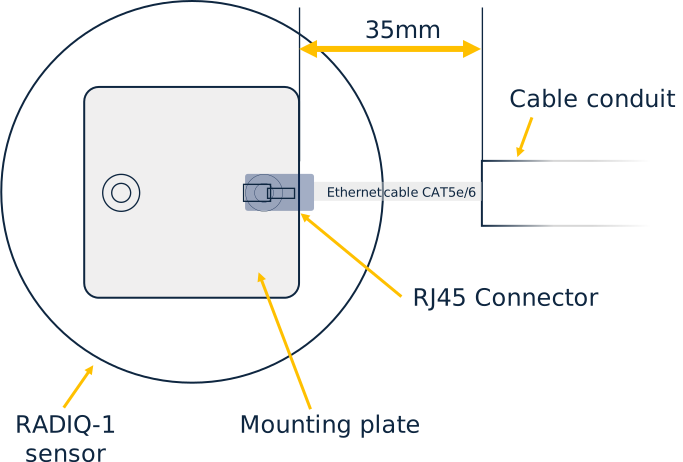
Sensor attachment
-
Attach the PoE cable to the sensor and connect the sensor’s back to the firmly installed mounting plate. The mounting bracket fits to the square groove on the back of the sensor.
-
Only attach the sensor to the mounting plate if it is screw connected or the glue is strong enough to carry weight, according to the glue manufacturers recommendations.
-
Mount the sensor with the plastic cover facing towards the area to be monitored.
-
Mount the sensor with the PoE connector facing towards the PoE cable conduit and ensure there is no tensile force on the cable connected to the sensor.
-
Ensure the sensor is firmly attached to the mounting plate prior to use.
-
Correct mounting can be assumed when the sensor can only be detached using manual force and can not spin on the mounting plate.
|
Wiring Diagram
Power supply
The QUMEA RADIQ-1 sensor is connected using a shielded CAT5 or better Ethernet cable to a PoE power source. Power should be applied using an IEEE 802.3-2015-compliant, PoE-capable power device, such as a PoE switch, router or injector. Any other supply might damage the device. The sensor signals as a PoE class 2 Type 1 device (<6.5 W) and hosts a fully IEEE 802.3at compatible, non-isolated supply regulator
When connecting multiple RADIQ-1 sensors to one PoE-source, ensure the maximum output power rating of the device is greater than the combined power requirements of all sensors (6.5 W each) and other potentially attached PoE devices.
Network Access
The PoE-power sourcing device has to be able to access the internet and QUMEAs cloud infrastructure. You might need to adjust your firewall or network infrastructure accordingly. The sensors’ Ethernet MAC address is printed on the sensor label. The sensors’ host name is equal to its serial number and it supports both IPv4 and IPv6 internet protocol. The sensor is intended to be used in a DHCP enabled networking environment.
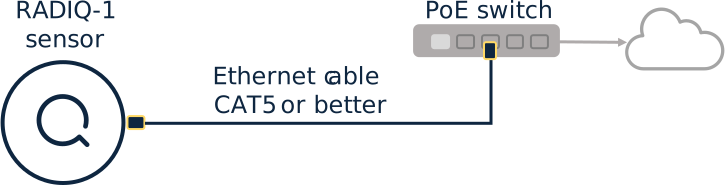
More information on PoE and sensor power supply are found in section Startup.
Sensor handling
The sensor does not require any user interaction
Objects and ventilation holes
-
Never push objects of any kind into the sensor through the enclosure slots as they may touch dangerous voltage points or short out parts that could result in a fire or an electric shock.
-
DO NOT place any objects on the sensor or within a 20 cm radius when the sensor is operational.
Important
-
Do not apply pressure to the sensor cover area which may compromise the integrity of the device.
-
The manufacturer’s warranty does not cover user abuse or improper installations.
-
DO NOT cover nor paint the sensor or sensor accessories